
| 일 | 월 | 화 | 수 | 목 | 금 | 토 |
|---|---|---|---|---|---|---|
| 1 | 2 | 3 | 4 | 5 | 6 | 7 |
| 8 | 9 | 10 | 11 | 12 | 13 | 14 |
| 15 | 16 | 17 | 18 | 19 | 20 | 21 |
| 22 | 23 | 24 | 25 | 26 | 27 | 28 |
- interconnect
- IAM
- terraform
- cicd
- Python
- AWS
- cloud
- github
- docker
- 후기
- vm
- 자격증
- devops
- vpc peering
- Java
- 우테캠
- gcp
- VAGRANT
- Uptime Check
- kubernetes
- Clean Code
- pub/sub
- cloud function
- 보안 규칙
- cloud armor
- CentOS
- Google Cloud Platform
- Terraform Cloud
- MIG
- direnv
- Today
- Total
EMD Blog
React Native에 대해 알아보자 본문
javcReact Native
React Native란 페이스북에서 개발한 오픈소스 모바일 애플리케이션 프레임워크다. 자세하게 살펴보기 전에 먼저 native에 대해서 잠깐 살펴보고 가자
개발을 시작한지 얼마되지 않은 분이나 혹은 개발을 해본적이 없는 사람이라면 개발에서 말하는 native라는 단어가 생소할 수 있다. 구글 번역기에 native를 입력해보면 원주민?으로 해석이 되서 나오는데 앱에서는 우리가 지금 알아보고자 하는 App에서는 Android SDK를 이용해 Java, Kotlin으로 개발하는 안드로이드 앱이나 IOS SDK를 이용해 Objective-C, Swift로 개발하는 IOS앱을 Native App이라고 한다. 각 플랫폼 자체에서 제공해주는 최적화된 개발도구를 사용해 개발했을 경우 Native App이라고 말하는데 이렇게 보면 native 원래 뜻과 비슷한 부분이 있어보이기는 하다.
그럼 이제 React Native에 대해 다시 살펴보자. React Natvie는 Javascript를 이용해서 앱 개발을 할 수 있는 크로스 플랫폼 기술인데 말 그대로 'React' Native기 때문에 React와 거의 비슷한 문법(실제로 동작원리도 거의 같다)을 통해 개발을 할 수 있으며 크로스 플랫폼 기술이기 때문에 한번만 코드를 작성해도 IOS와 Android 환경에서 모두 사용할 수 있다. Native라는 이름에서 알 수 있듯이 개발은 Javascript로 하지만 이 Javascript 코드를 통해 Native UI를 조작하게 되며 실제로 네이티브 플랫폼 기능을 사용할 수 있다.
그럼 이것만 있으면 굳이 안드로이드와 IOS의 각 플랫폼별로 따로 개발하지 않아도 Native하게 개발할 수 있으니 무조건 좋은 것이 아닌가 싶겠지만 각자 장단점이 존재하므로 정확하게 알고 개발 기술을 선택하는 것이 좋다. (React-Native와 같은 크로스 플랫폼 기술 Flutter를 도입하려고한 LINE)
크로스 플랫폼 기술이 다 그러하듯이 일단 가장 좋은 장점은 시간/비용 단축에 있다. 둘이서 개발할 것을 혼자서하고 동시 개발을 통해 시간또한 단축할 수 있으니 가장 큰 장점이라고 할 수 있다. 하지만 위 LINE의 도입사례처럼 기술의 한계가 존재하기 때문에 꼭 도입전에 개발하고자 하는 기술이 React Native로 개발 가능한지 확인해야할 필요가 있다. 물론 Native로 Module을 만들어 React Native에 적용할 수도 있긴하지만 IOS와 Android 각각 따로 만들어야하고 그말은 Android와 IOS개발이 가능해야한다는 뜻이기 때문에 시작부터 선택을 잘하는 것이 중요하다.
React Native 동작원리 및 특징
그렇다면 어떻게 Javascript로 Native App을 만들 수 있을까? React Native의 동작원리에 대해 알아보도록 하자.
먼저 Native와 React Native의 동작방식을 비교해보자
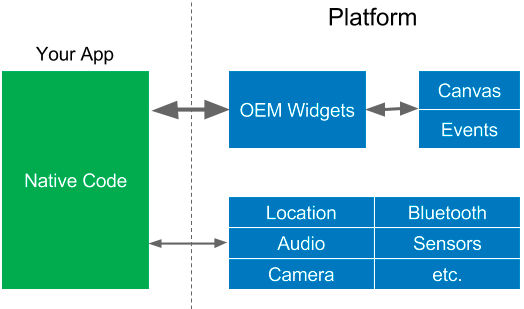 |  |
이미지 출처 : https://hackernoon.com/whats-revolutionary-about-flutter-946915b09514
위 이미지는 기존 Native App(왼쪽)과 React Native(오른쪽)의 동작방식을 나타낸 그림이다. 단순하게 비교해보면 Native App은 플랫폼 내 위젯이나 하드웨어에 직접 접근해서 동작하는 모습을 볼 수 있으며 React Native는 중간에 Bridge를 통해 플랫폼과 통신하는 것을 볼 수 있다. 여기서 Bridge는 React Native로 작성한 App과 Native 플랫폼 중간에서 징검다리 역할을 수행하는데 Android와 IOS외에도 각 플랫폼에 맞는 Bridge만 존재한다면 같은 코드로 해당 플랫폼에 맞는 어플리케이션 제작이 가능하며 Native로 제작된 Module과도 통신할 수 있도록 인터페이스를 제공하기 때문에 굉장히 유연하다는 특징을 가지고 있다.
React나 React Native는 JSX(Javascript XML)라는 XML비슷한 자체적인 문법을 사용하는데 꼭 JSX를 필수로 사용해야하는 것은 아니나, 굉장히 가독성이 좋아지는 효과가 있다. 먼저 샘플 코드를 보자
// JSX를 사용하지 않은 코드
const App = () => {
  return (
    React.createElement(View, {height: '100%', alignItems: 'center', justifyContent: 'center'},
      React.createElement(Text, {}, 'Sample code!')
    )
  );
};
// JSX를 사용한 코드
const App = () => {
return (
<View
style={{height: '100%', alignItems: 'center', justifyContent: 'center'}}>
<Text>Sample code!</Text>
</View>
);
};위가 JSX를 사용하지 않은 코드고 아래가 JSX를 사용한 코드다. 대충 보면 UI를 createElement 함수를 통해 조작했었는데 JSX를 이용해서 Tag를 통한 조작방식을 사용하고 있다. 두 코드는 완전히 동일하게 작동하며 표현 방식만 다르고 결국에는 빌드시 Babel을 통해 위 코드와 같이 createElement 호출로 컴파일하게 된다.
근데 위 createElement 코드를 보면 아래 View, Text element들을 생성할 때 매개변수로 객체(View, Text)를 사용하는 모습을 볼 수 있다. 여기서 React의 가장 큰 장점 중 하나인 Component를 이용한 개발방식을 확인할 수 있다.
공식 홈페이지에서는 Component에 대한 설명을 아래처럼 설명하고 있다.
React는 별도의 파일에 마크업과 로직을 넣어 기술을 인위적으로 분리하는 대신, 둘 다 포함하는 “컴포넌트”라고 부르는 느슨하게 연결된 유닛으로 관심사를 분리합니다.
마크업과 로직을 포함하는 컴포넌트를 통해 관심사를 분리한다고 한다. 간단한 코드를 확인해보자
// 화면 중앙에 햄버거 모양을 출력
const Hamburger = () => {
  return (
    <View style={{height: '100%', width: '100%', alignItems: 'center', justifyContent: 'center'}}>

      // 빵
      <View style={{height: 50, width: '80%', backgroundColor: '#BB6928', borderTopLeftRadius: 20, borderTopRightRadius: 20}}></View>

      // 토마토
      <View style={{height: 30, width: '80%', backgroundColor: '#E11B03'}}></View>

      // 양상추
      <View style={{height: 20, width: '95%', backgroundColor: '#16C60C'}}></View>

      // 치즈
      <View style={{height: 5, width: '80%', backgroundColor: '#EED486'}}></View>

      // 패티
      <View style={{height: 40, width: '80%', backgroundColor: '#603912'}}></View>

      // 빵
      <View style={{height: 50, width: '80%', backgroundColor: '#BB6928', borderBottomLeftRadius: 20, borderBottomRightRadius: 20 }}></View>
    </View>
  );
};
style때문에 지저분하지만 결과는 햄버거 모양을 출력한다.(View는 HTML의 div라 생각하면 된다.)
그럼 이 코드에 Component를 활용해서 리펙토링 해보자
const Bread = props => {
  return <View style={[styles.bread, styles[props.position]]}></View>;
};

const Tomato = () => {
  return <View style={styles.tomato}></View>;
};

const Lettuce = () => {
  return <View style={styles.lettuce}></View>;
};

const Cheese = () => {
  return <View style={styles.cheese}></View>;
};

const Patty = () => {
  return <View style={styles.patty}></View>;
};

const Hamburger = () => {
  return (
    <View style={styles.container}>
      <Bread position="positionTop" />
      <Tomato />
      <Lettuce />
      <Cheese />
      <Patty />
      <Bread position="positionBottom" />
    </View>
  );
};

const styles = StyleSheet.create({
  container: {
    height: '100%',
    width: '100%',
    alignItems: 'center',
    justifyContent: 'center',
  },
  bread: {
    height: 50,
    width: '80%',
    backgroundColor: '#BB6928',
  },
  positionTop: {
    borderTopLeftRadius: 20,
    borderTopRightRadius: 20,
  },
  positionBottom: {
    borderBottomLeftRadius: 20,
    borderBottomRightRadius: 20,
  },
  tomato: {
    height: 30,
    width: '80%',
    backgroundColor: '#E11B03',
  },
  lettuce: {
    height: 20,
    width: '95%',
    backgroundColor: '#16C60C',
  },
  cheese: {
    height: 5,
    width: '80%',
    backgroundColor: '#EED486',
  },
  patty: {
    height: 40,
    width: '80%',
    backgroundColor: '#603912',
  },
});
Component로 분리한 결과이다. 기존의 Hamburger 함수 내에 작성되어 있던 View element와 style을 제거하고 Hamburger함수 외부에 각 View의 역할별로 새로운 함수(Bread, Tomato, Lettuce... )를 선언했다. 그리고 선언한 함수에서 style이 적용된 View를 반환하게 한 후 해당 함수명을 Hamburger내에 element로 사용하고 있다. 즉, 외부함수를 element로 사용하고 있는 것이다. 전 코드와 비교하면 많이 길어지긴 했지만 주석이 필요없을 정도로 코드가 명확해졌으며 다른 종류의 햄버거 코드를 작성하더라도 지금 만들어 놓은 component(토마토,치즈,패티 등 내용물)를 재활용할 수 있게 되었다.
그런데 위 함수들 중에 빵을 보면 매개변수로 props를 받고 있다. 그리고 이 함수를 사용하는 Hamburger내 element를 보면 position이라는 이름으로 property를 선언하고 있는데 여기서 선언한 property들(여러개일 수 있다)은 해당 컴포넌트에 단일(property 개수에 상관없이 전부다 props 하위로 전달된다. 즉, props.propertyname으로 접근해야한다.)

참고로 Component는 ES6의 class로도 작성할 수 있다.
function Bread(props) {
  return <View style={[styles.bread, styles[props.position]]}></View>;
};
const Bread = props => {
return <View style={[styles.bread, styles[props.position]]}></View>;
};class Bread extends React.Component {
render() {
return <View style={[styles.bread, styles[this.props.position]]}></View>;
}
}위 코드들은 모두 똑같이 작동한다. (Component에 대해 더 자세하게 알고 싶다면 공홈에 한글문서가 잘 되어있다.)
Component와 props를 사용해 보았으니 이번엔 state도 한번 사용해보자
state는 말그대로 component의 상태이다. 예시 코드를 한번 보도록 하자
class App extends React.Component {
  constructor(props) {
    super(props);
    this.state = {sampleValue: 0};
  }

  componentDidMount() {	// 이 component가 렌더링되면 한번 호출된다.
    setTimeout(() => {
      this.setState({sampleValue: 5});
    }, 5000);
  }

  render() {
    return (
      <View style={{ height: '100%', alignItems: 'center', justifyContent: 'center', }}>
        <Text>현재 상태 값 : {this.state.sampleValue}</Text>
      </View>
    );
  }
}
결과부터 보면, 화면 중앙에 '현재 상태 값 : 0'이 출력되고 5초 뒤에 '현재 상태 값 : 5'로 변경된다. 즉, 상태(state)가 변경되면 해당 state를 직간접적으로 사용중인 component들이 다시 랜더링된다. ( super(props)에 대한 설명은 여기를 참고하자 )
state의 큰 특징들은 다음과 같다
1. component의 state는 해당 component내에서만 수정 가능하다.
state를 다른 component props로 전달은 가능하나 어차피 props는 읽기만 가능하기 때문에 수정은 state를 초기화한 component에서만 수정 가능하다.
2. state는 setState()를 통해 수정해야만 component가 다시 렌더링된다.
this.state.sampleValue = 5 이런식으로 state값을 수정할 경우 component가 다시 렌더링되지 않는다. 반드시 this.setState를 사용해서 변경해야 element가 렌더링된다. ex) this.setState({sampleValue: 5});
3. setState는 비동기적으로 작동한다.
setState는 성능 향상을 위해 중복호출을 비동기 방식을 통해 단일 업데이트로 처리한다.
class App extends React.Component {
  constructor(props) {
    super(props);
    this.state = {sampleValue: 0};
  }

  increment = () => {
    this.setState({sampleValue: this.state.sampleValue + 1});
    console.log('Now', this.state.sampleValue);
  };

  render() {
    return (
      <View style={{height: '100%', alignItems: 'center', justifyContent: 'center'}}>
        <Text>현재 값 : {this.state.sampleValue}</Text>
        <Button title="update" onPress={this.increment} />
      </View>
    );
  };
}
위 코드에서 button 클릭시 console 상에 update전 sampleValue값이 먼저 출력되고 이후에 sampleValue가 update된다.
(비동기 프로그래밍에 대해 관심이 있다면 다음 글들을 읽어보자 비동기 프로그래밍1, 비동기 프로그래밍2)
만약 실행순서를 보장해야할 경우 setState의 두번째 인자로 callback 함수를 보내면 된다.
class App extends React.Component {
  constructor(props) {
    super(props);
    this.state = {sampleValue: 0};
  }

  increment = () => {
    this.setState({sampleValue: this.state.sampleValue + 1}, this.printSampleValue);
  };

  printSampleValue = () => {
    console.log('Now', this.state.sampleValue);
  };

  render() {
    return (
      <View style={{height: '100%', alignItems: 'center', justifyContent: 'center'}}>
        <Text>현재 값 : {this.state.sampleValue}</Text>
        <Button title="update" onPress={this.increment} />
      </View>
    );
  };
}
위 코드의 경우 sampleValue가 update되고 console에 sampleValue가 출력된다.
4. 단방향 바인딩이다.
1번에서 본 것처럼 state는 state를 초기화한 component에서만 setState를 통해 수정이 가능하고 자식 component의 props로 보냈을 경우 수정이 불가능하다. 자식 component는 해당 props가 어디서 어떻게 왔는지 알 수 없고(캡슐화) 수정도 불가능하기 때문에 전체적인 흐름을 봤을 때 부모 component에서 자식 component로 데이터가 한방향으로만 흐르는 것을 볼 수 있다.
5. setState는 병합 방식이다.
setState는 병합 방식이라 update시 같은 depth의 다른 값에 영향을 주지 않고 update한다. 다음의 코드를 보자
class App extends React.Component {
  constructor(props) {
    super(props);
    this.state = {
      first: {
        name: 'cavin',
        weight: '120',
      },
      second: {
        name: 'hany',
        weight: '80',
      },
    };
  }

  updateMember = () => {
    this.setState({first: {name: 'chris', weight: '80'}}, this.printMember);
  };

  printMember = () => {
    console.log('Now', this.state);
  };

  render() {
    return (
      <View style={{height: '100%', alignItems: 'center', justifyContent: 'center'}}>
        <Button title="update" onPress={this.updateMember} />
      </View>
    );
  };
}
위 코드는 버튼을 누르면 state의 fist값을 변경하고 state전체를 console에 출력한다. 이 코드의 결과는 아래와 같다
{
	first: {
    	name: 'chris',
        weight: '80',
    },
    second: {
    	name: 'hany',
        weight: '80',
    }
}
이렇게 second는 그대로 두고 first만 변경되는 것을 확인할 수 있다.
그런데 병합은 1depth에만 적용된다. 아래 코드도 보자
class App extends React.Component {
  constructor(props) {
    super(props);
    this.state = {
      first: {
        name: 'cavin',
        weight: '120',
      },
      second: {
        name: 'hany',
        weight: '80',
      },
    };
  }

  updateMember = () => {
    this.setState({first: {name: 'chris', height: '180'}}, this.printMember);
  };

  printMember = () => {
    console.log('Now', this.state);
  };

  render() {
    return (
      <View style={{height: '100%', alignItems: 'center', justifyContent: 'center'}}>
        <Button title="update" onPress={this.updateMember} />
      </View>
    );
  };
}
이 코드 결과는 아래와 같다.
{
	first: {
    	name: 'chris',
        height: '180',
    },
    second: {
    	name: 'hany',
        weight: '80',
    }
}
second는 그대로 있지만 first 하위에 weight은 사라졌다. 만약에 하위까지 병합하고 싶을 경우에는 아래와 같이하면 된다.
class App extends React.Component {
  constructor(props) {
    super(props);
    this.state = {
      first: {
        name: 'cavin',
        weight: '120',
      },
      second: {
        name: 'hany',
        weight: '80',
      },
    };
  }

  updateMember = () => {
  	//...this.state.first 추가
    this.setState({first: {...this.state.first, name: 'chris', height: '180'}}, this.printMember);
  };

  printMember = () => {
    console.log('Now', this.state);
  };

  render() {
    return (
      <View style={{height: '100%', alignItems: 'center', justifyContent: 'center'}}>
        <Button title="update" onPress={this.updateMember} />
      </View>
    );
  };
}
...this.state.first의 ...은 전개연산자이다. (전개연산자)
결과는 아래와 같다.
{
	first: {
    	name: 'chris',
        weight: '120'
        height: '180',
    },
    second: {
    	name: 'hany',
        weight: '80',
    }
}
이렇게 React Native의 동작 방식과 기본적인 개념에 대해 알아보았다.
조사해보면서 느낀거지만 React랑 정말 똑같아서 만약에 React Native를 처음 접한다하면은 React부터 공부하는게 좋을 듯하다. React는 공홈이 한글로 정말 잘되어있으니 이리저리 찾아볼 것 없이 바로 가서 읽으면서 따라하기만 하면 된다.
[참고자료]