
| 일 | 월 | 화 | 수 | 목 | 금 | 토 |
|---|---|---|---|---|---|---|
| 1 | 2 | 3 | 4 | |||
| 5 | 6 | 7 | 8 | 9 | 10 | 11 |
| 12 | 13 | 14 | 15 | 16 | 17 | 18 |
| 19 | 20 | 21 | 22 | 23 | 24 | 25 |
| 26 | 27 | 28 | 29 | 30 | 31 |
- vpc peering
- 후기
- vm
- CentOS
- MIG
- Java
- Python
- 자격증
- kubernetes
- Uptime Check
- cloud function
- pub/sub
- gcp
- devops
- cloud
- docker
- 보안 규칙
- Google Cloud Platform
- Terraform Cloud
- cloud armor
- VAGRANT
- Clean Code
- cicd
- interconnect
- IAM
- direnv
- AWS
- terraform
- github
- 우테캠
- Today
- Total
EMD Blog
Spring Boot와 Jenkins를 이용한 ECR Push(2) 본문
Jenkins를 설치했다면 파일을 주고 받기위해 RSA 암호화 키를 생성해야 한다. RSA Key를 생성하는 이유는 Jenkins에서 Git Repository에 접근할 때 Http가 아닌 SSH 방식으로 접근할 것이기 때문이다. 그럼 Key를 먼저 생성해보자. 생성하는 위치는 Jenkins가 설치되어 있는 서버 내 아무곳에나 생성하면 된다.
$ ssh-keygen -t rsa -f study

Enter passphrase (empty for no passphrase):
Enter same passphrase again:
Your identification has been saved in study.
패스워드의 경우 일단 비워두고 진행하도록 하자.
-t 암호화 형식이다. RSA를 사용할 것이므로 rsa로 하자. -f는 파일명 및 경로이다.
키가 정상적으로 생성됐다면 Github와 Jenkins에 해당 키들을 등록해주자.
일단 Github부터 등록하자. 프로젝트 Repository -> Settings -> Deploy keys -> Add deploy key로 이동 후 아래와 같이 title과 공개키를 입력한다.
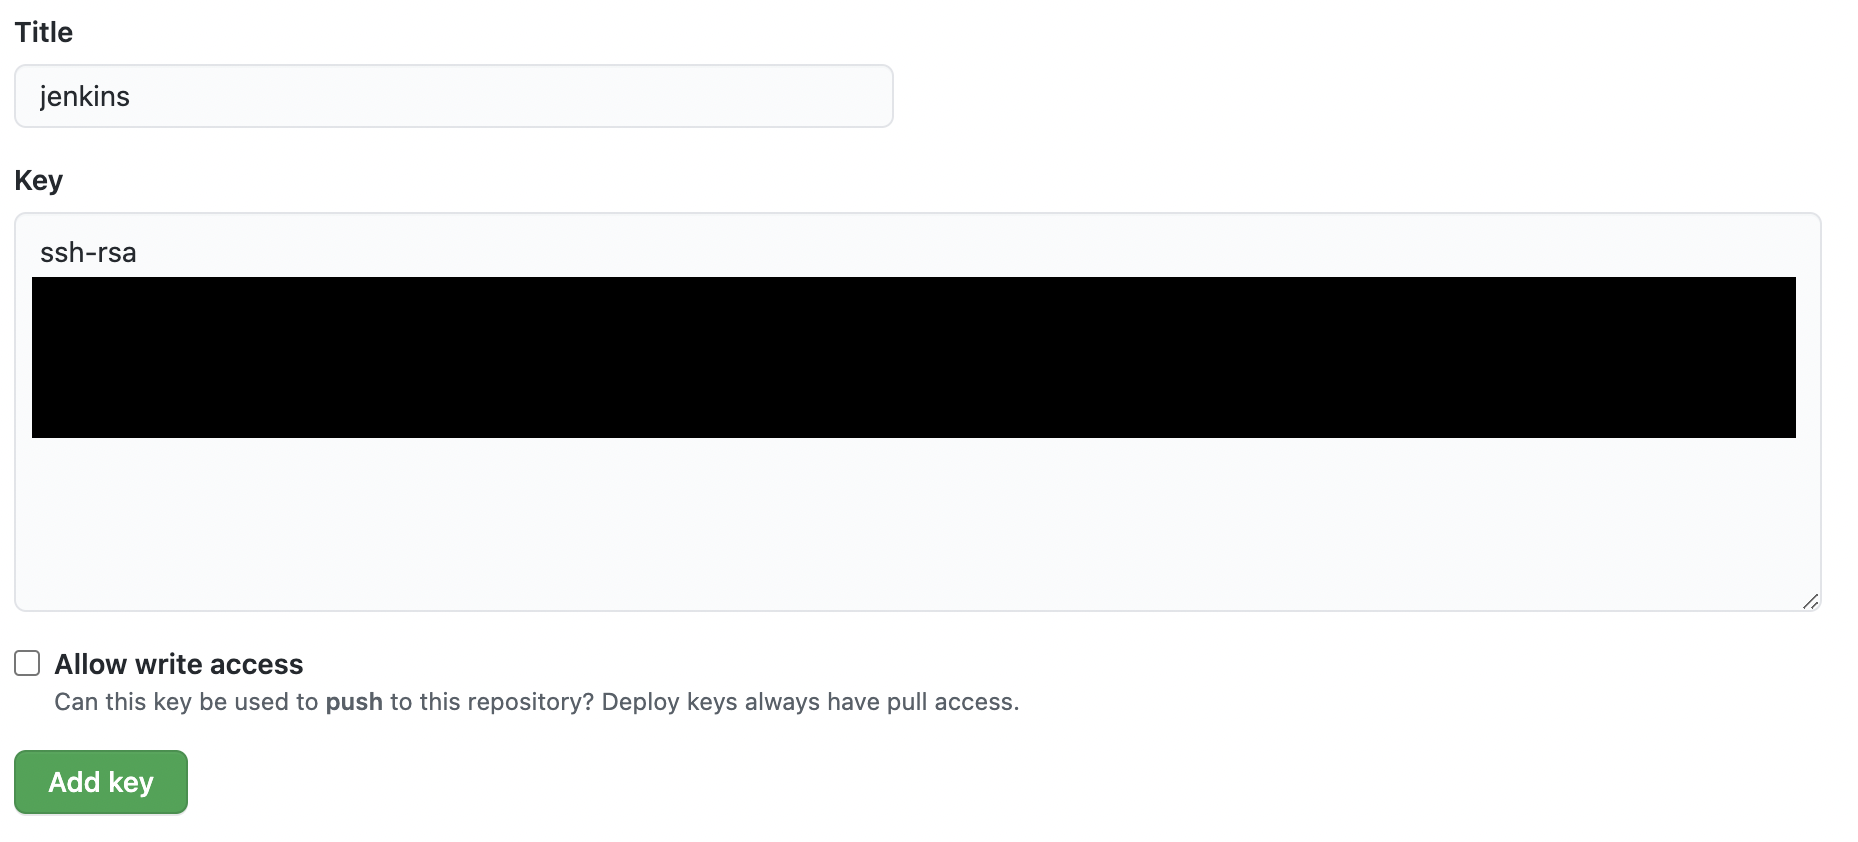
위에서 생성한 키중 .pub확장자가 붙은 키가 공개키이며 cat으로 출력 후 모두 복사해서 붙여넣으면 된다. (ssh-rsa까지 전부 복사하자.)
그 다음 jenkins에 개인키를 등록하자. Jenkins관리 -> Manage Credentials -> Store scoped to Jenkins -> global -> Add credentials로 이동해서 다음과 같이 입력하자.
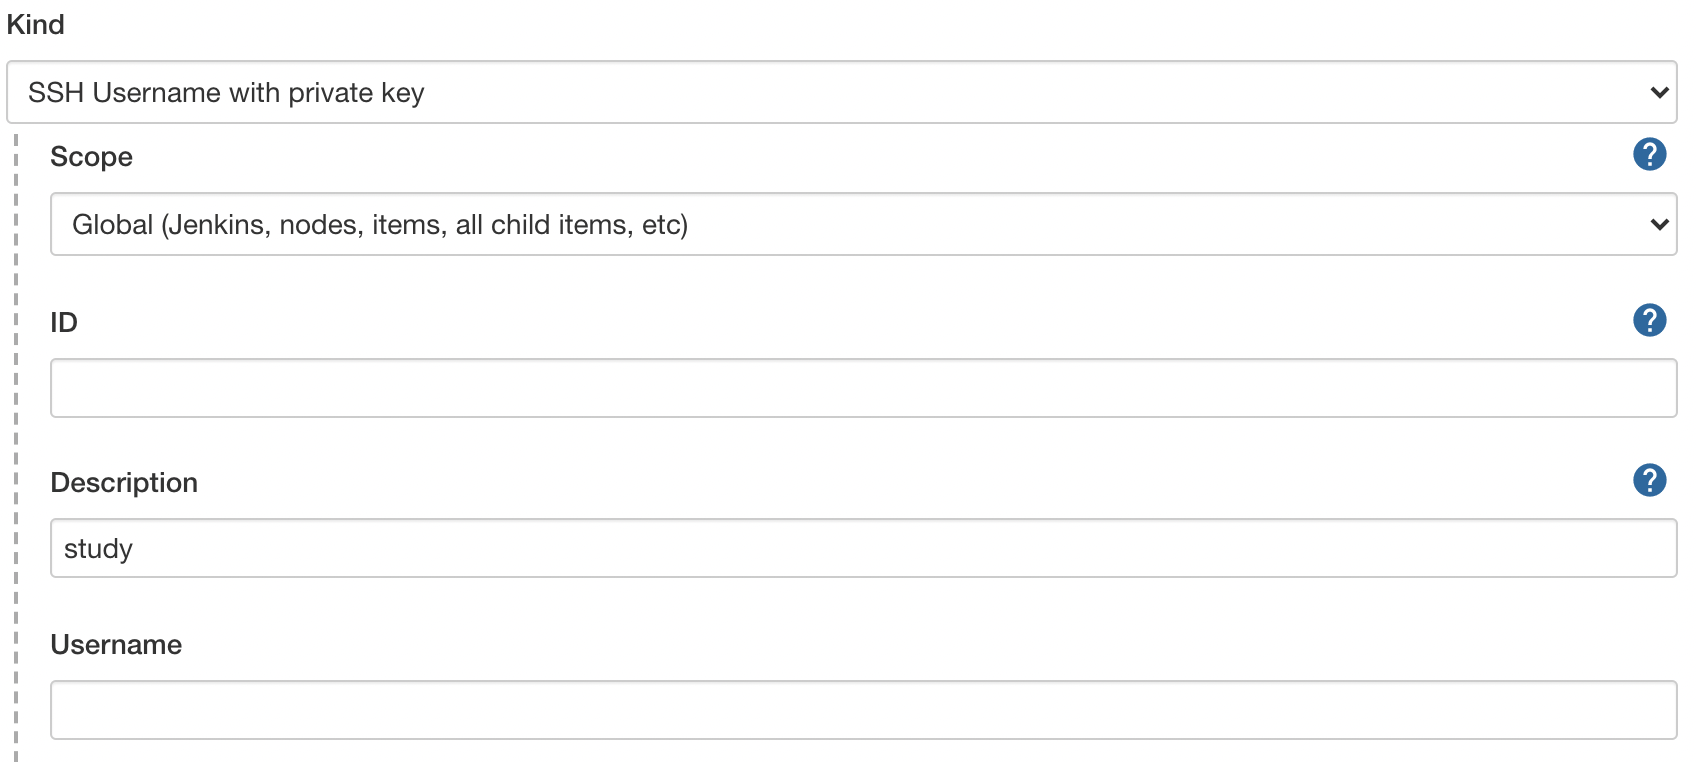
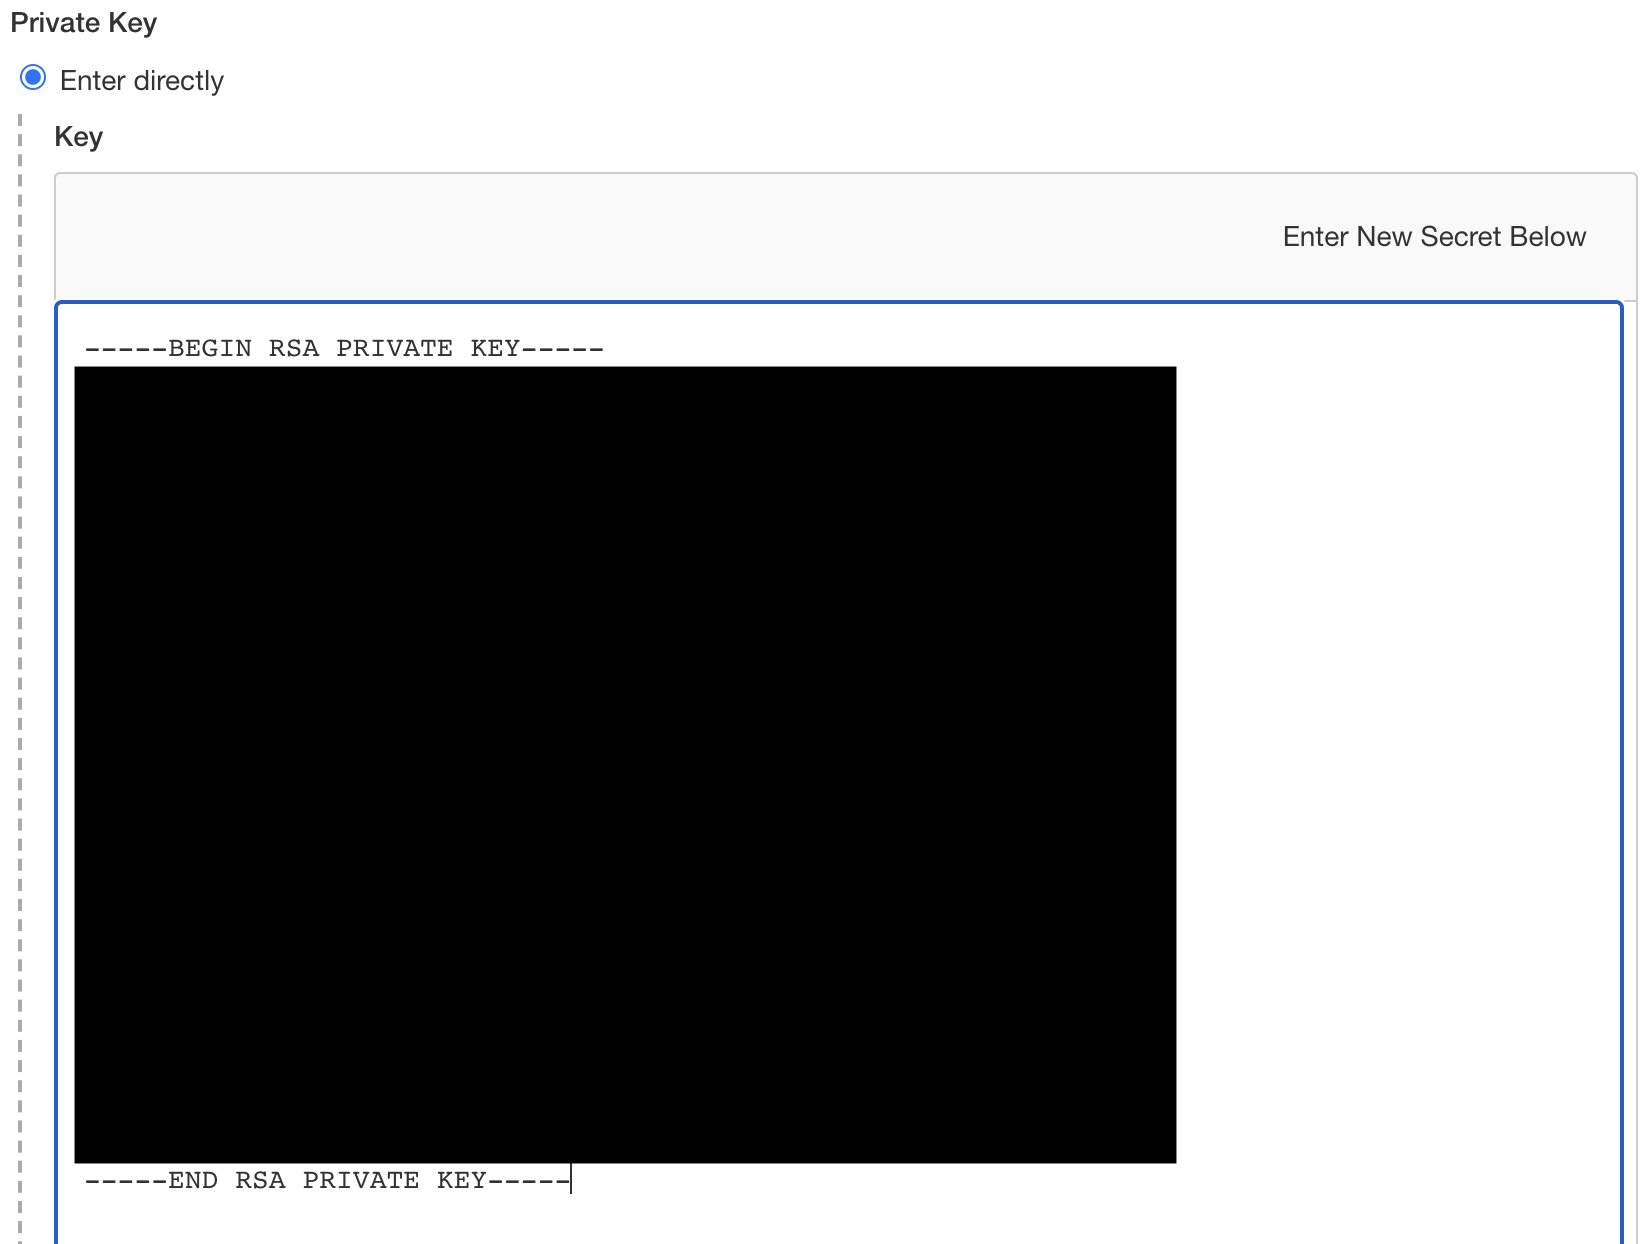

SSH에 대한 인증정보를 등록해야하므로 Kind를 SSH username with private key로 지정하자. ID의 경우 자동 생성되므로 빈칸으로 두고 키가 많아질 경우를 대비해 Description만 보기 쉽게 적어주자. username의 경우 Github에서 SSH clone경로를 복사해올 때 앞에 명시(git@)되어있기 때문에 따로 적어주지 않아도 괜찮다. 그 다음 아까 생성한 key 중 private key를 cat으로 출력해 전부 복사해서 붙여넣자.( BEGIN, END도 전부 포함시켜야한다. ) 만약에 키생성했을 때 비밀번호를 설정했다면 Passphrase에 적어주도록 하자.
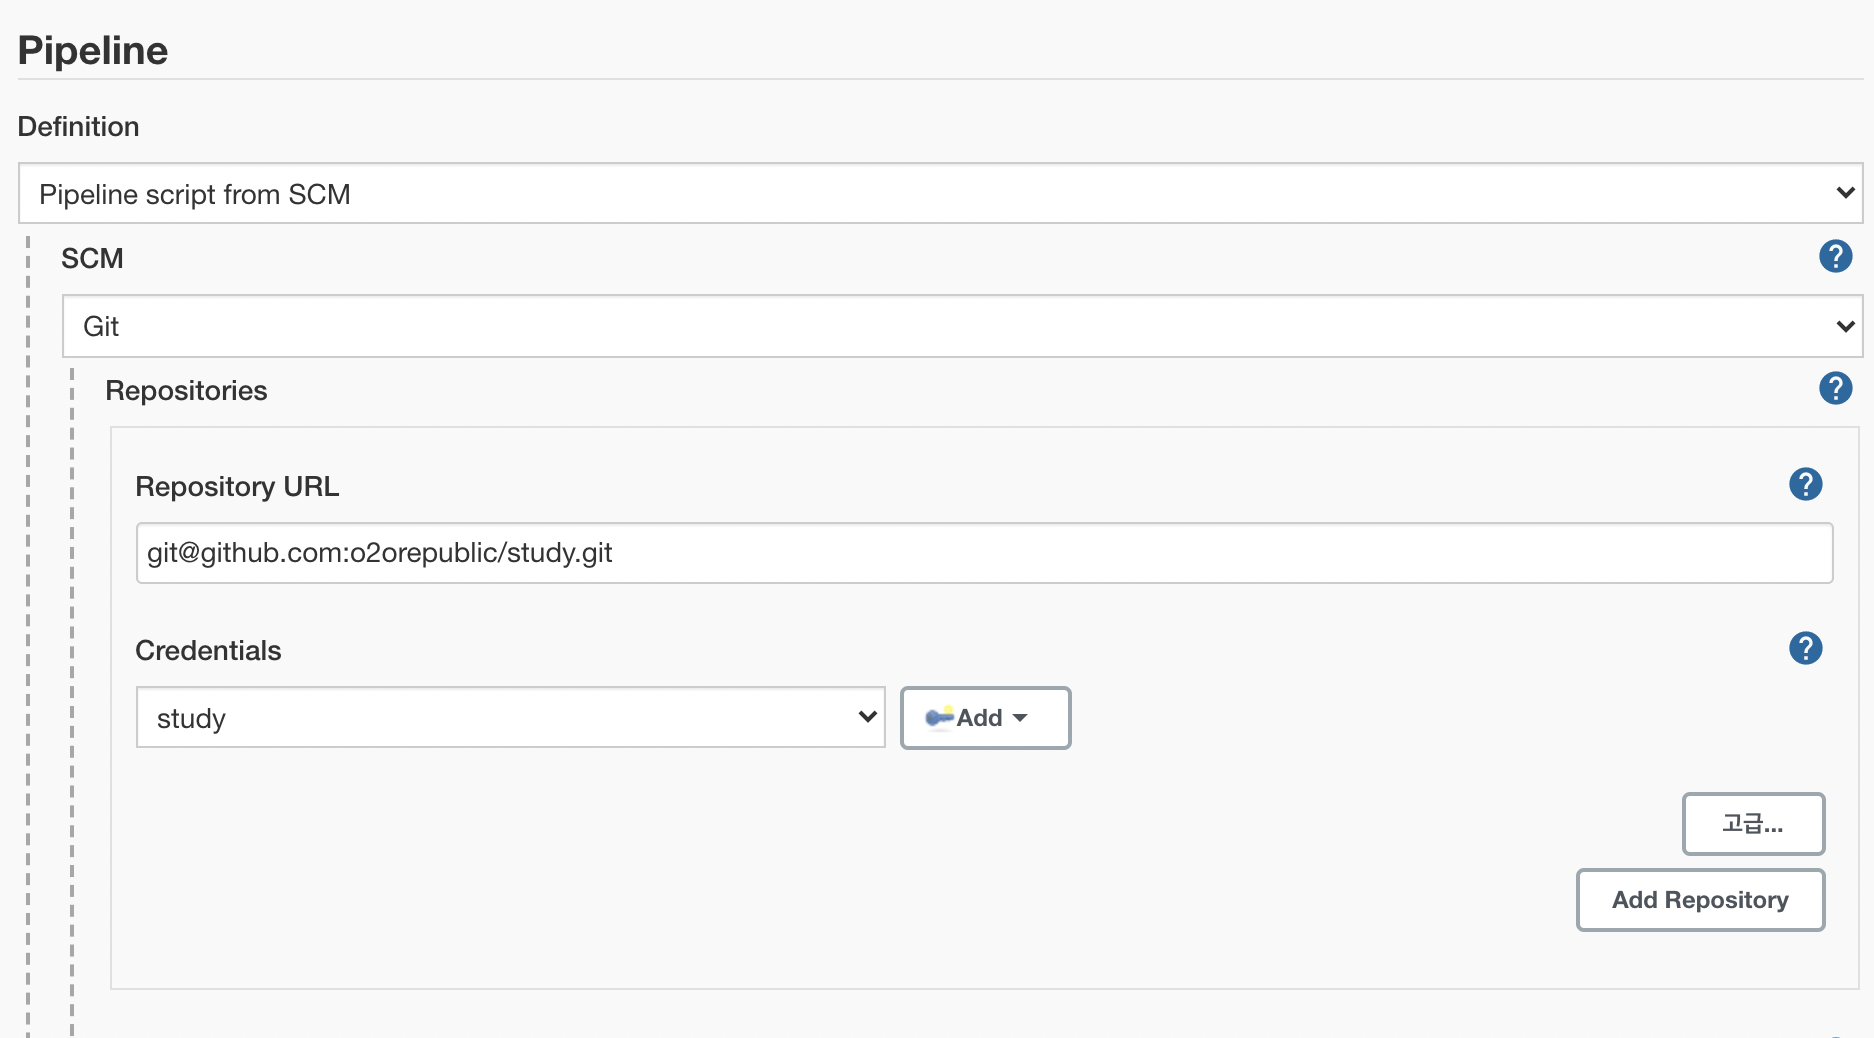
이렇게 양쪽에 키를 등록했으면 이제 Pipeline을 생성하자. Dashboard -> 새로운 item -> Pipeline을 선택하자. item명은 project명으로 하자. 그 다음 ok 클릭 후 넘어가면 item에 대한 다양한 설정을 할 수 있다. 아래와 같이 설정하자.

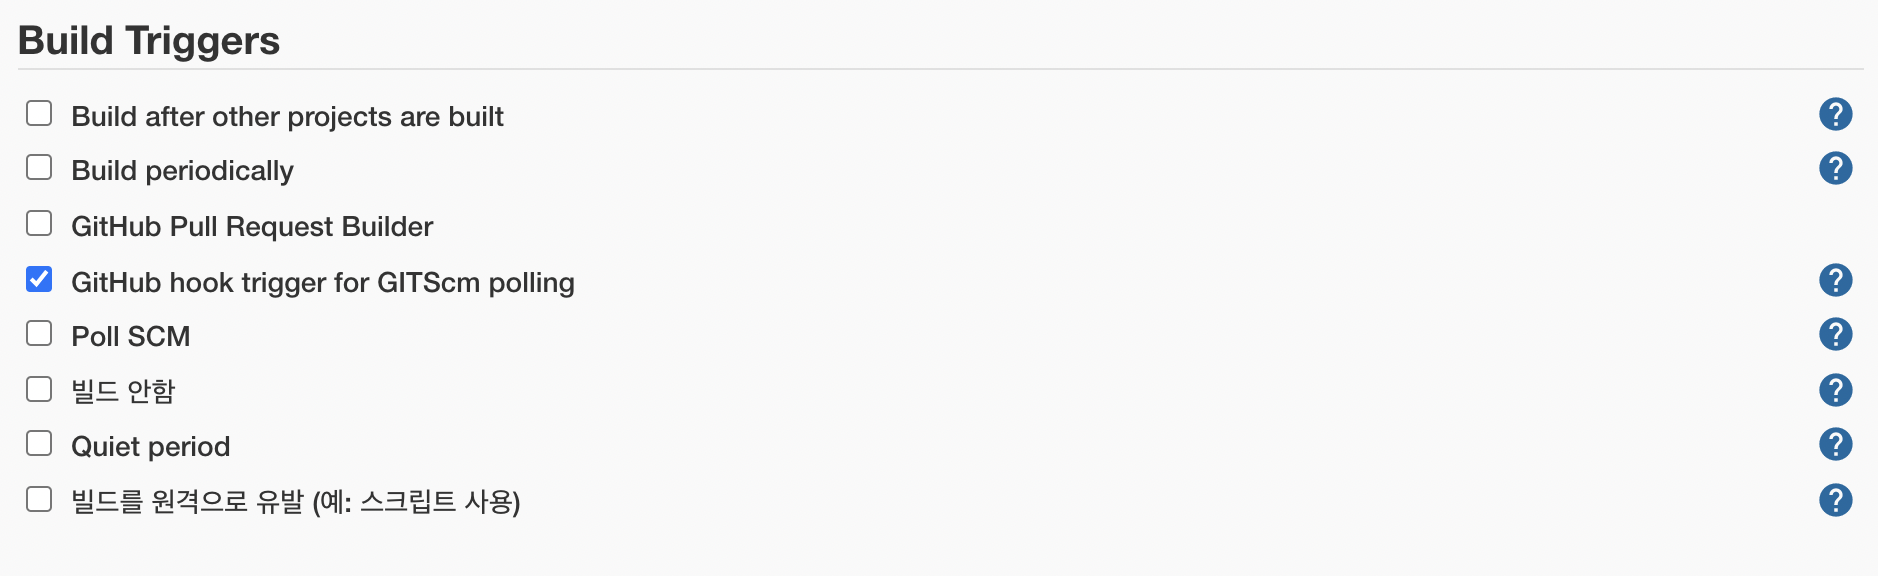

우리가 하려고 하는 것은 Github의 master branch에 push(또는 commit)가 발생하면 webhook을 jenkins로 보내 테스트 및 빌드를 하려고 하는 것이다. 즉, master로 push -> jenkins로 webhook -> project clone(ssh) -> 빌드/테스트/ECR Push의 흐름이 된다.
위에서 설정한 내용을 하나씩 보면
Github hook trigger for GITScm polling : webhook을 trigger로 빌드할 것이므로 체크한다.
Pipeline
- Definition: Pipeline은 직접 jenkins에 script 파일을 작성할수도 있고 프로젝트에 pipeline script파일을 읽어서 실행할 수도 있다. 우리는 프로젝트에 Jenkins 파일(pipeline정의 파일)을 만들 것이므로 Pipeline script from SCM을 선택한다. (SCM은 Source Code Management의 약자로 Git이나 SVN같은 것들을 말한다.)
- SCM : Git을 사용하므로 Git을 선택하자
- RepositoryURL : github repository -> clone -> ssh 를 복사해서 붙여넣자
- Credentials: 아까 등록했던 개인키를 선택하자
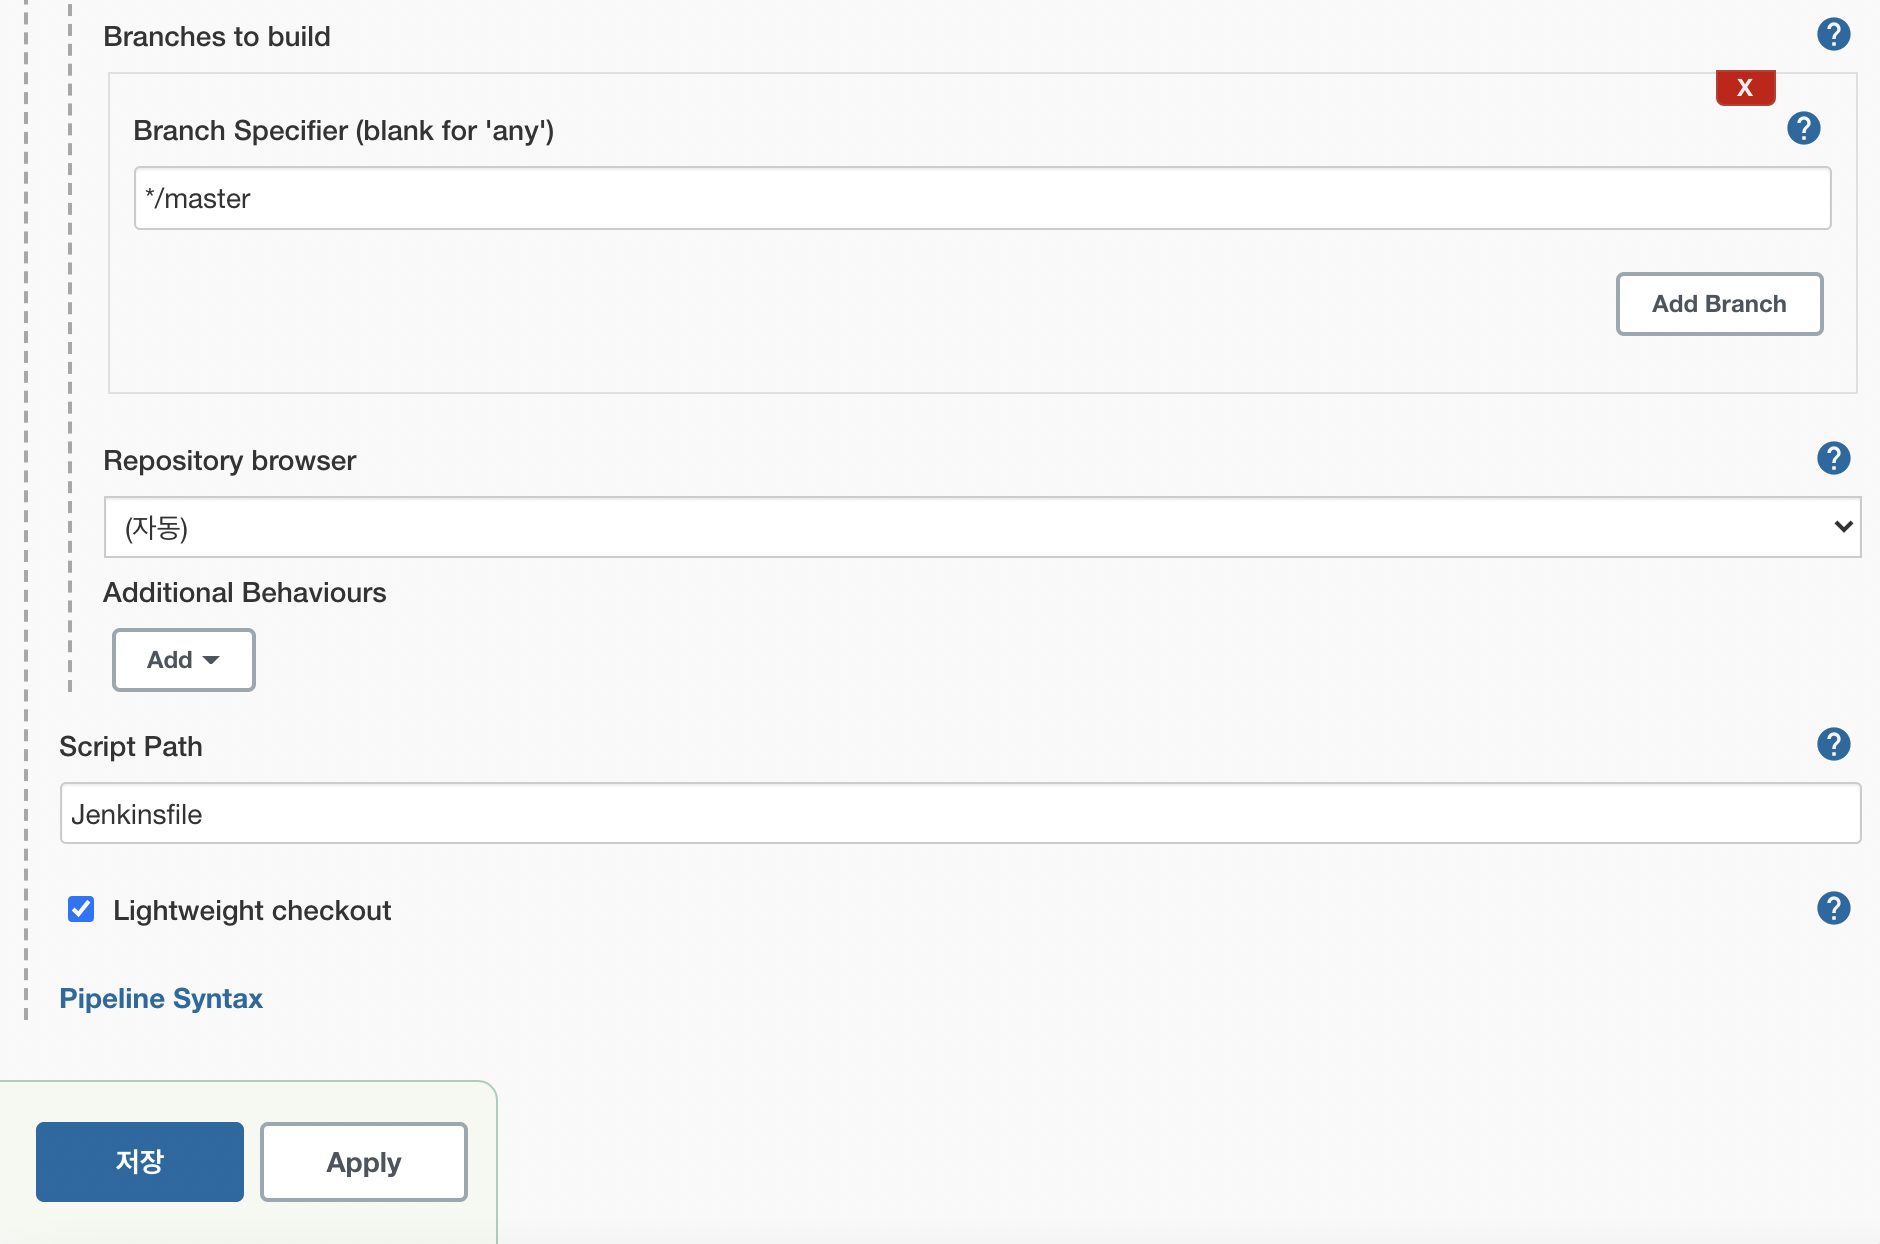
- Branch Specifier: master에 Push한 빌드할 것이므로 */master 그대로 두자
- Script Path: pipeline script 파일명과 경로를 적어주자
이렇게 하고 저장 후 다시 Github로 가서 Webhook을 생성해주자.
Github repository -> Settings -> Webhooks -> Add webhook으로 이동해서 아래처럼 입력해주자.
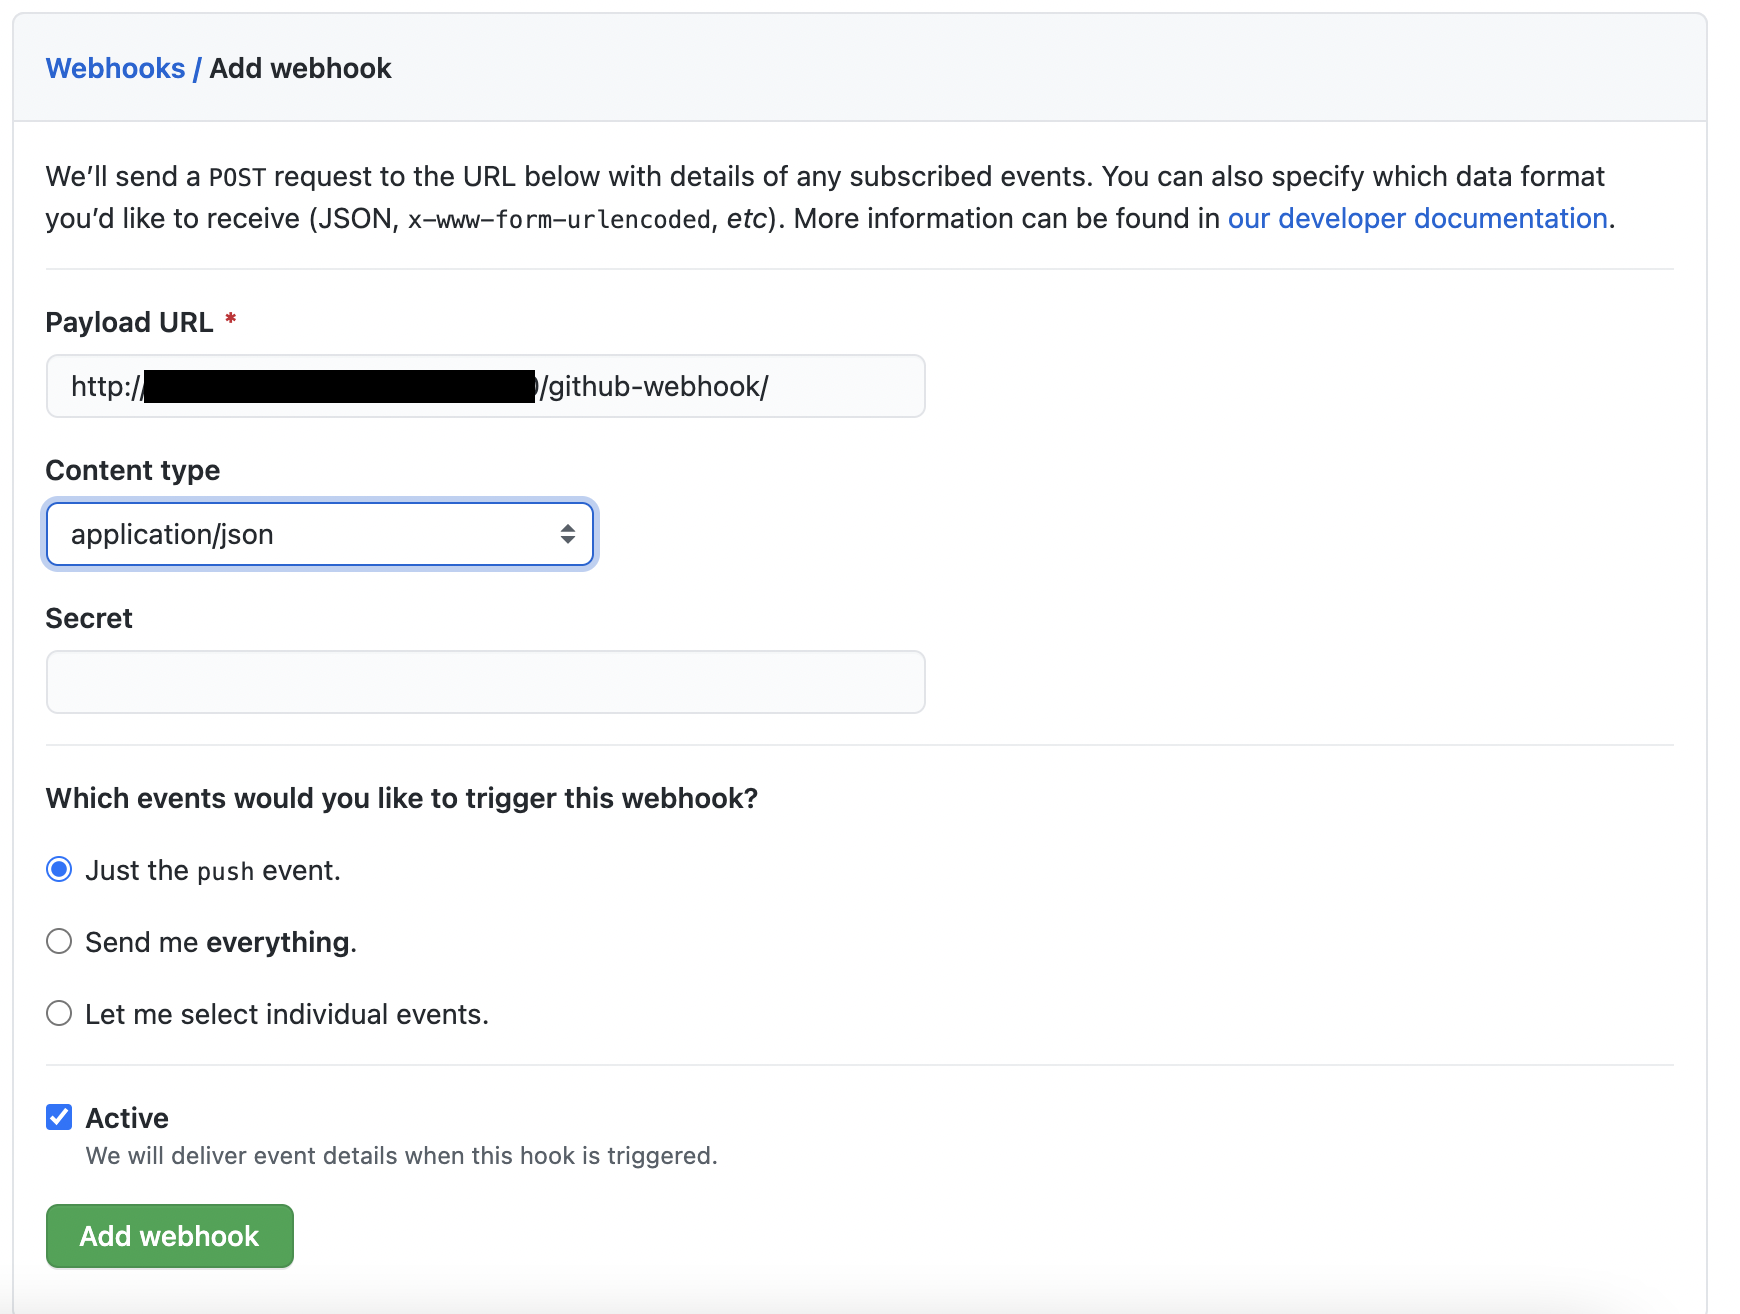
Webhook은 이름은 거창해보이지만 그냥 Payload URL로 요청 보내는 것이 전부다. 거기에 body에 repository정보나 사용자 정보, push 및 commit 정보를 담아서 보내주는 것이다. 그래서 jenkins나 slack처럼 webhook에 대한 인터페이스를 제공해주는 곳이 아니라도 직접 API 만들어서 webhook을 핸들링할 수 있다.
payload에는 http://자신의JenkinsURL/github-webhook/ 을 적어주고 Content type을 application/json으로 바꿔준 후 Add webhook 버튼을 클릭해 저장해주자.
이렇게 하면 webhook 세팅도 끝이 나게 된다. 그럼 본격적으로 테스트/빌드 후 ECR에 Push해보자.
Jenkins Pipeline을 생성할 때 pipeline script file(Jenkinsfile)을 읽도록 설정했었고 그 Jenkinsfile에는 테스트, 빌드, ECR Push에 관한 내용이 들어가야한다. 하지만 Jenkinsfile을 작성하기 전에 환경을 분리해주는 작업이 필요한데 환경에 따라 DynamoDB 컨테이너를 실행하거나 endpoint를 다르게 설정해주거나 accessKey를 설정해주어야할 수도 있다.
- Local : DynamoDB Container 실행 또는 실행중인 DynamoDB 사용
- Jenkins(test): DynamoDB Container 실행 또는 실행중인 DynamoDB 사용, Jenkins가 Container로 실행 중이므로 endpoint에 Host주소나 DynamoDB Container Gateway 주소를 입력
- Production: Endpoint만 AWS DynamoDB로 설정
이렇게 각각의 환경이 다르다. 물론 최대한 비슷하게 설정할 수도 있지만 최소한 Production환경과 개발환경은 분리해야하기 때문에 설정은 거의 필수라고 할 수 있다. 그럼 환경을 나눠보도록 하자. 우리는 위 예시를 따르기 위해 3개의 환경으로 나눌 것이다.
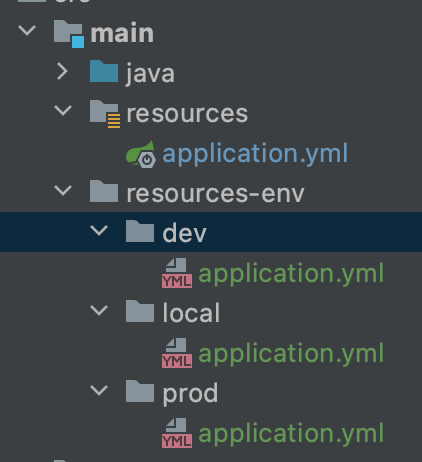
먼저 application.yml을 나누도록 하자. main하위에 resources-env 폴더를 생성하고 그 안에 local/dev/prod 폴더를 생성 후 각 폴더안에 application.yml을 생성하자.
resources 안에 있는 application.yml에는 공통으로 적용될 환경설정을 작성하면된다. 자유롭게 작성하자(아무것도 안넣어도 된다.)
resources-local 안에 있는 application.yml에는 다음처럼 작성하자.
server:
  port: 8080
amazon:
  dynamodb:
    endpoint: "http://localhost:8000"
    region: "ap-northeast-2"
  aws:
    accesskey: ""
    secretkey: ""
서버 포트와 DynamoDB에 대한 정보들이다. Local에 DynamoDB가 Container로 실행되고 있어 endpoint를 localhost로 설정했다. DynamoDB local은 무료이기 때문에 accessKey와 secretkey를 입력하지 않아도 된다.
그 다음 resources-dev 안에 있는 application.yml은 아래처럼 작성하자.
server:
  port: 8081
amazon:
  dynamodb:
    endpoint: "http://10.0.0.52:8000"
    region: "ap-northeast-2"
  aws:
    accesskey: ""
    secretkey: ""
jenkins에서 사용될 환경설정이다. 8080포트는 이미 사용중이기 때문에 8081포트를 사용하며 host주소인10.0.0.52가 endpoint가 된다.
마지막으로 resources-prod의 application.yml은 아래처럼 작성하자
server:
  port: 8080
amazon:
  dynamodb:
    endpoint: "http://dynamodb.ap-northeast-2.amazonaws.com/"
    region: "ap-northeast-2"
  aws:
    accesskey: "AWDWFEFSDCSD1231D"
    secretkey: "ADA12FE123SG23SGS321DFV3S21ESEFW"
Endpoint는 AWS의 dynamodb로 설정해주고 accesskey와 secretkey를 설정해주면 된다.
그럼 이제 gradle.build을 설정해주자.
...

ext.profile = (!project.hasProperty('profile') || !profile) ? 'local' : profile

sourceSets {
    main {
        resources {
            srcDirs "src/main/resources", "src/main/resources-env/${profile}"
        }
    }

    integrationTest {
        java {
            compileClasspath += main.output
            compileClasspath += main.compileClasspath
            compileClasspath += test.output
            compileClasspath += test.compileClasspath
            runtimeClasspath += test.runtimeClasspath
        }
    }
}

task dockerComposeReBuild(type: Exec) {
    commandLine "docker-compose", "build", "--no-cache"
}

task dockerComposeUp(type: Exec) {
    group = 'dynamodb'
    commandLine "docker-compose", "up", "-d"
}

task dockerComposeDown(type: Exec) {
    group = 'dynamodb'
    commandLine "docker-compose", "down"
}

task integrationTest(type: Test) {
    group = 'verification'
    testClassesDirs = sourceSets.integrationTest.output.classesDirs
    classpath = sourceSets.integrationTest.runtimeClasspath

    shouldRunAfter test
    useJUnitPlatform()
}

check.dependsOn integrationTest

task createDogTable (type: Exec) {
    group = 'dynamodb'
    commandLine "bash", "-c", "sleep 3; bash src/main/resources/scripts/create-dog-table.sh"
}

task deleteDogTable (type: Exec) {
    group = 'dynamodb'
    commandLine "bash", "src/main/resources/scripts/delete-dog-table.sh"
}

createDogTable.dependsOn dockerComposeUp
deleteDogTable.finalizedBy dockerComposeDown

if (profile == 'dev') {
    test.dependsOn createDogTable
    test.finalizedBy deleteDogTable

    integrationTest.dependsOn createDogTable
    integrationTest.finalizedBy deleteDogTable

    bootRun.dependsOn createDogTable
    bootRun.finalizedBy deleteDogTable
}
조금 길어졌지만 내용은 간단하다. profile(local,dev,prod)별로 다른 환경설정을 사용하도록하고 DockerCompose실행/종료에 대한 task생성, DynamoDB에 대한 task를 생성했으며, 통합 테스트를 위해 ClassPath를 설정해주었다. 그리고 마지막으로 이 task들을 순서에 맞게 실행되도록 dependsOn(before)과 finalizedBy(after)를 설정했다. 지금 나의 상황의 경우 Jenkins 인스턴스에 Dynamodb가 설치되어 있지 않아 profile을 dev로 해서 테스트할 경우 docker compose up -> table 생성 -> 테스트 -> table 제거 -> docker compose down의 절차를 거치도록 했다.
위에서 create-dog-table.sh와 delete-dog-table.sh는 아래처럼 작성해주면 된다.
create-dog-table.sh
aws dynamodb create-table \
    --table-name Dog \
    --attribute-definitions \
        AttributeName=id,AttributeType=S \
        AttributeName=dogType,AttributeType=S \
        AttributeName=createdAt,AttributeType=S \
    --key-schema \
        AttributeName=id,KeyType=HASH \
    --provisioned-throughput ReadCapacityUnits=1,WriteCapacityUnits=1 \
    --global-secondary-indexes \
"[ { \"IndexName\": \"byDogType\", \"KeySchema\": [ {\"AttributeName\": \"dogType\",\"KeyType\":\"HASH\"}, {\"AttributeName\": \"createdAt\",\"KeyType\":\"RANGE\"} ], \"Projection\": { \"ProjectionType\": \"ALL\" }, \"ProvisionedThroughput\": { \"ReadCapacityUnits\":1, \"WriteCapacityUnits\":1 } } ]" \
    --endpoint-url http://10.0.0.52:8000
delete-dog-table.sh
aws dynamodb delete-table \
  --table-name \
    Dog \
  --endpoint-url http://10.0.0.52:8000
그럼 이제 pipeline을 작성하자. Jenkinsfile을 만들어 아래처럼 작성하자.
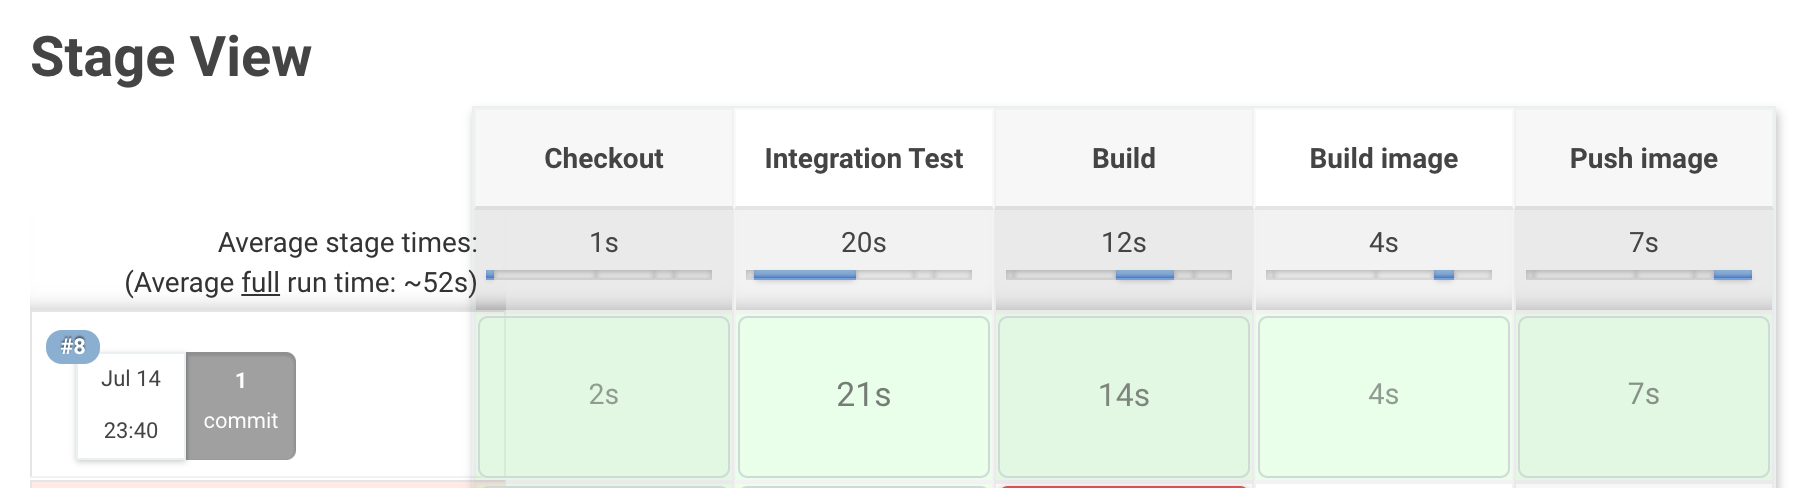
node {
    stage('Checkout') {
        checkout scm
    }

    stage('Integration Test') {
        sh './gradlew check -Pprofile=dev'
    }

    stage('Build') {
        sh './gradlew build -Pprofile=prod'
    }

    stage('Build image') {
        app = docker.build("143254234113.dkr.ecr.ap-northeast-2.amazonaws.com/study")
    }

    stage('Push image') {
        sh 'rm  ~/.dockercfg || true'
        sh 'rm ~/.docker/config.json || true'

        docker.withRegistry('https://143254234113.dkr.ecr.ap-northeast-2.amazonaws.com', 'ecr:ap-northeast-2:{credential ID}') {
            app.push("${env.BUILD_NUMBER}")
            app.push("latest")
        }
    }
}
위 파일은 다음 순서로 작동한다.
1. Checkout: Git Repository에서 코드를 가져옴
2. Integration Test: 통합테스트
3. Build: 빌드
4. Build image: Docker image로 빌드
5. Push image: ECR로 Push
ECR경로는 ECR에 Repository를 만들어서 복사해 붙여넣으면 된다. 그리고 jenkins로 가서 aws에 대한 access key와 secret access key를 등록하자.
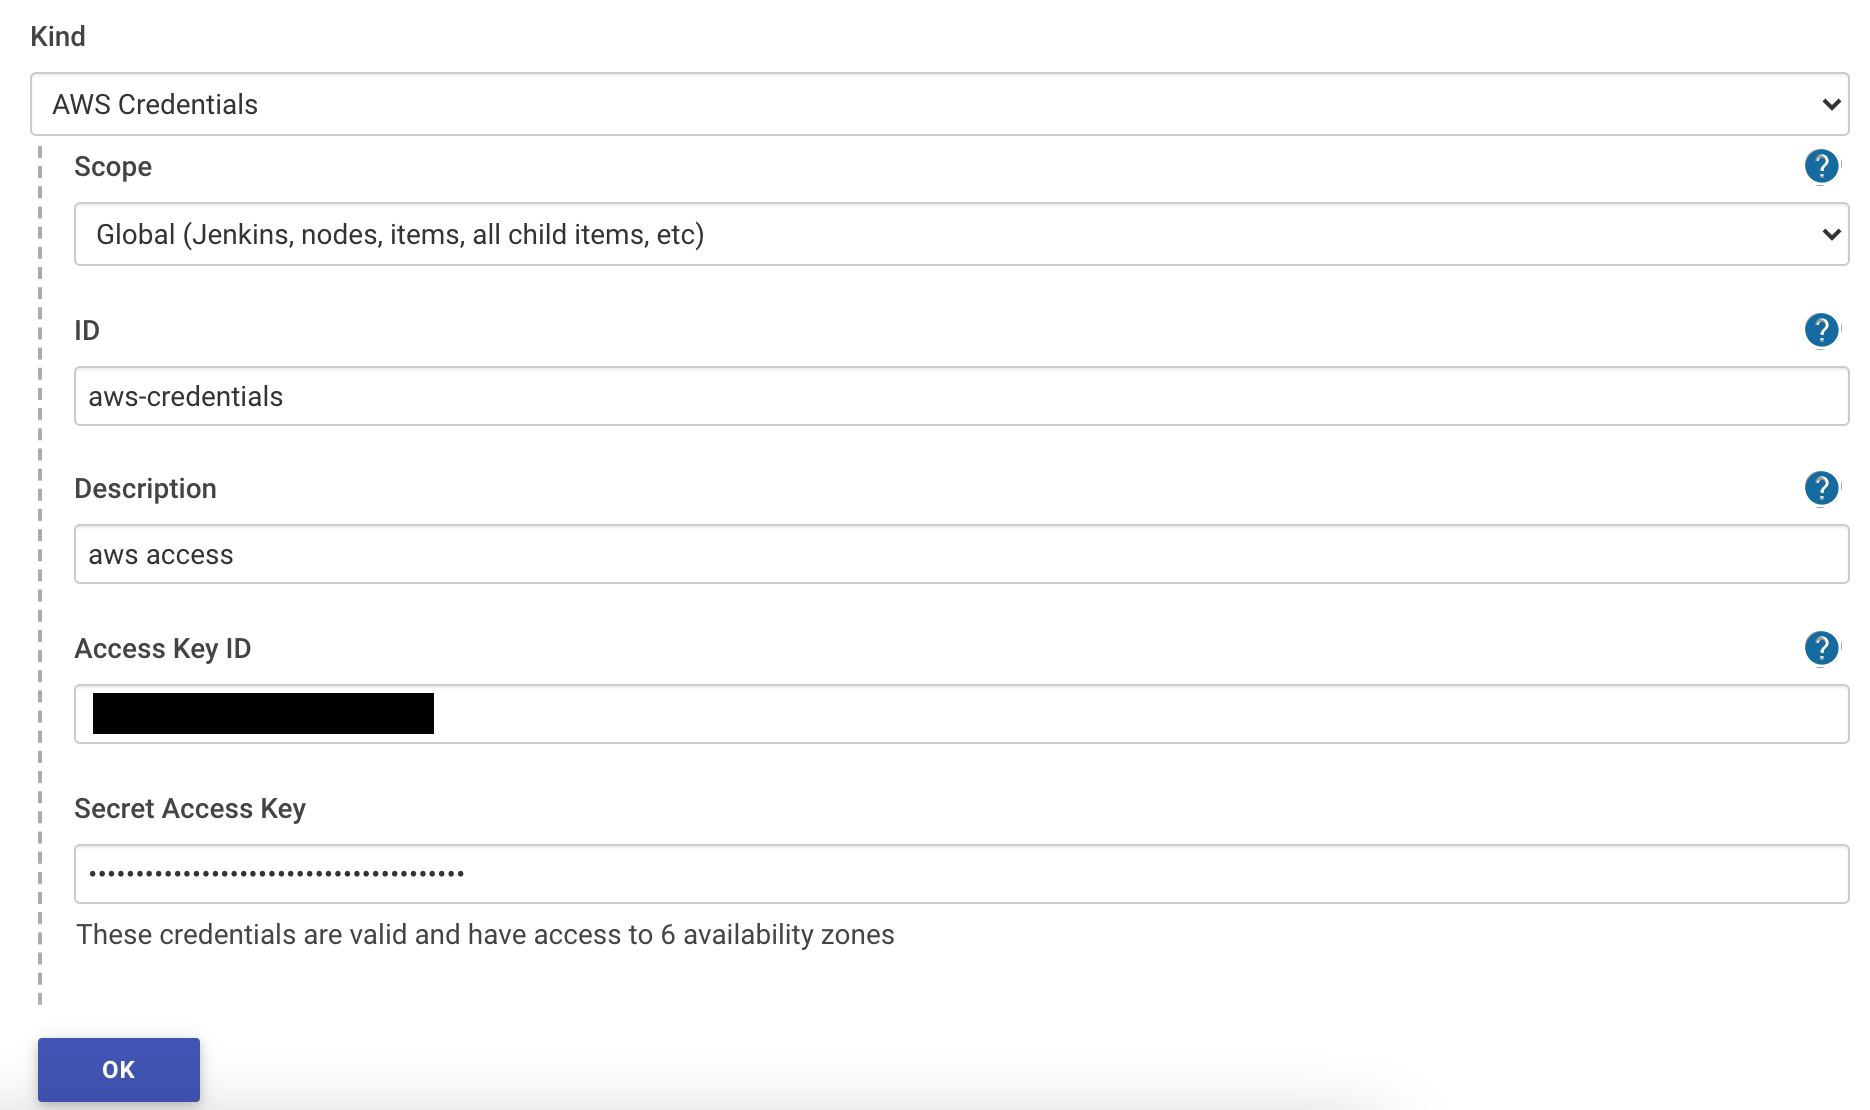
여기서 ID는 Jenkinsfile의 Push image stage에 있는 docker.withRegistry마지막 부분({credential ID})에 입력해야한다.이렇게 까지 했으면 Git에 push 해보자.
(* Push 전에 Repository에 대한 테스트들에 @Disabled 어노테이션을 추가해 테스트를 제외하도록 하자. )

그럼 위처럼 테스트 -> 빌드 -> 푸쉬가 진행된다.
'CICD' 카테고리의 다른 글
| Github Actions Terraform Output 이슈 (0) | 2022.09.04 |
|---|---|
| Spring Boot와 Jenkins를 이용한 ECR Push(1) (0) | 2021.05.31 |
| Container를 이용한 PHP 개발환경 가상화와 배포 자동화를 해보자 (2) (0) | 2021.04.29 |
| Container를 이용한 PHP 개발환경 가상화와 배포 자동화를 해보자 (1) (0) | 2021.04.08 |